3. Build the outline
Goal: build a real course structure and prove every way of rearranging it holds.
Prerequisite: flow 1 done. Work in the Course Content section of the workspace.
This is the densest surface in the product and the one most likely to hide a bug. Take it slowly.
The two modes
The toggle on the right of the Course Content header switches between Edit and Reorder. It is not cosmetic — each mode exposes a different set of row actions, and an action missing from one mode is not a bug.
| Edit | Reorder | |
|---|---|---|
| Rename a title inline | yes | no |
| Drag handle | no | yes |
| Move up / Move down | no | yes |
| Move to module | no | yes (activities only) |
| Add new item / Add content | yes | no |
| Duplicate / Remove | yes | no |
Adding content
Three entry points, and they do different things:
| Control | Where | Adds to |
|---|---|---|
| Add Module (folder+ icon) | Course Content header | course root |
| Add Content (file+ icon) | Course Content header | course root |
| Add new item | a module’s own row, Edit mode | inside that module |
The Add Content dialog is a quantity picker, not a single-item picker. Seven types — Lesson, Quiz, Survey, Assignment, Forum, Meeting, External Course — each with a stepper. The count is typeable and goes up to 99 per type, and one submit can mix types.
Steps
- From the empty state, click Add Module. Rename it.
- Add a second module.
- On module 1, use Add new item and add 3 Lessons in one go — set the Lesson stepper to 3 and click Add.
- On module 2, add 1 Quiz and 1 Survey in the same submit.
- From the header, click Add Content and add 1 Lesson — it lands at the course root, not inside a module.
- Add a module inside module 1 (modules can nest).
What to check
- Three lessons arrive as three separate rows, not one.
- Mixed submit creates both the quiz and the survey.
- Header Add Content lands at root; module Add new item lands inside the module.
- Every new row gets a default title and the activity count in Course at a glance keeps up.
Edit mode
Renaming
Click the title once to arm it, click again to focus it, type, then press Tab or click
away. The blur is what saves — typing alone does not.
Row actions
| Row | Actions |
|---|---|
| Module | Add new item, Remove |
| Activity | Add content (opens that activity’s editor), Duplicate, Remove |
Remove always asks for confirmation. Duplicate copies the row in place.
On narrow screens the individual buttons collapse into a single ⋯ menu with the same actions — worth one pass at phone width.
Expanding and collapsing
The folder icon in the header toggles Expand all / Collapse all. Individual modules
toggle by clicking the module header, or with Enter / Space when it has focus.
Steps
- Rename a module and a lesson. Reload and confirm both stuck.
- Duplicate a lesson. Rename the copy and confirm the original did not change.
- Remove a lesson, confirm the dialog appears, accept.
- Remove a module that still has activities inside it.
- Collapse all, expand all, then toggle one module on its own.
What to check
- Renaming survives a reload.
- The duplicate is independent of the original.
- Removing a module takes its children with it, and the counts update.
- Cancelling the confirmation removes nothing.
Reorder mode
Switch the toggle to Reorder. The row actions change and a drag handle appears on the left of each row.
Three ways to move an item
- Drag and drop — grab the handle and drop the row where you want it, including into or out of a module.
- Move up / Move down — the arrow buttons on the row. This is the keyboard-reachable
path:
Tabto the arrow, pressEnter. Test this one; it is the path that gets skipped. - Move to module — activities only. Opens a dialog.
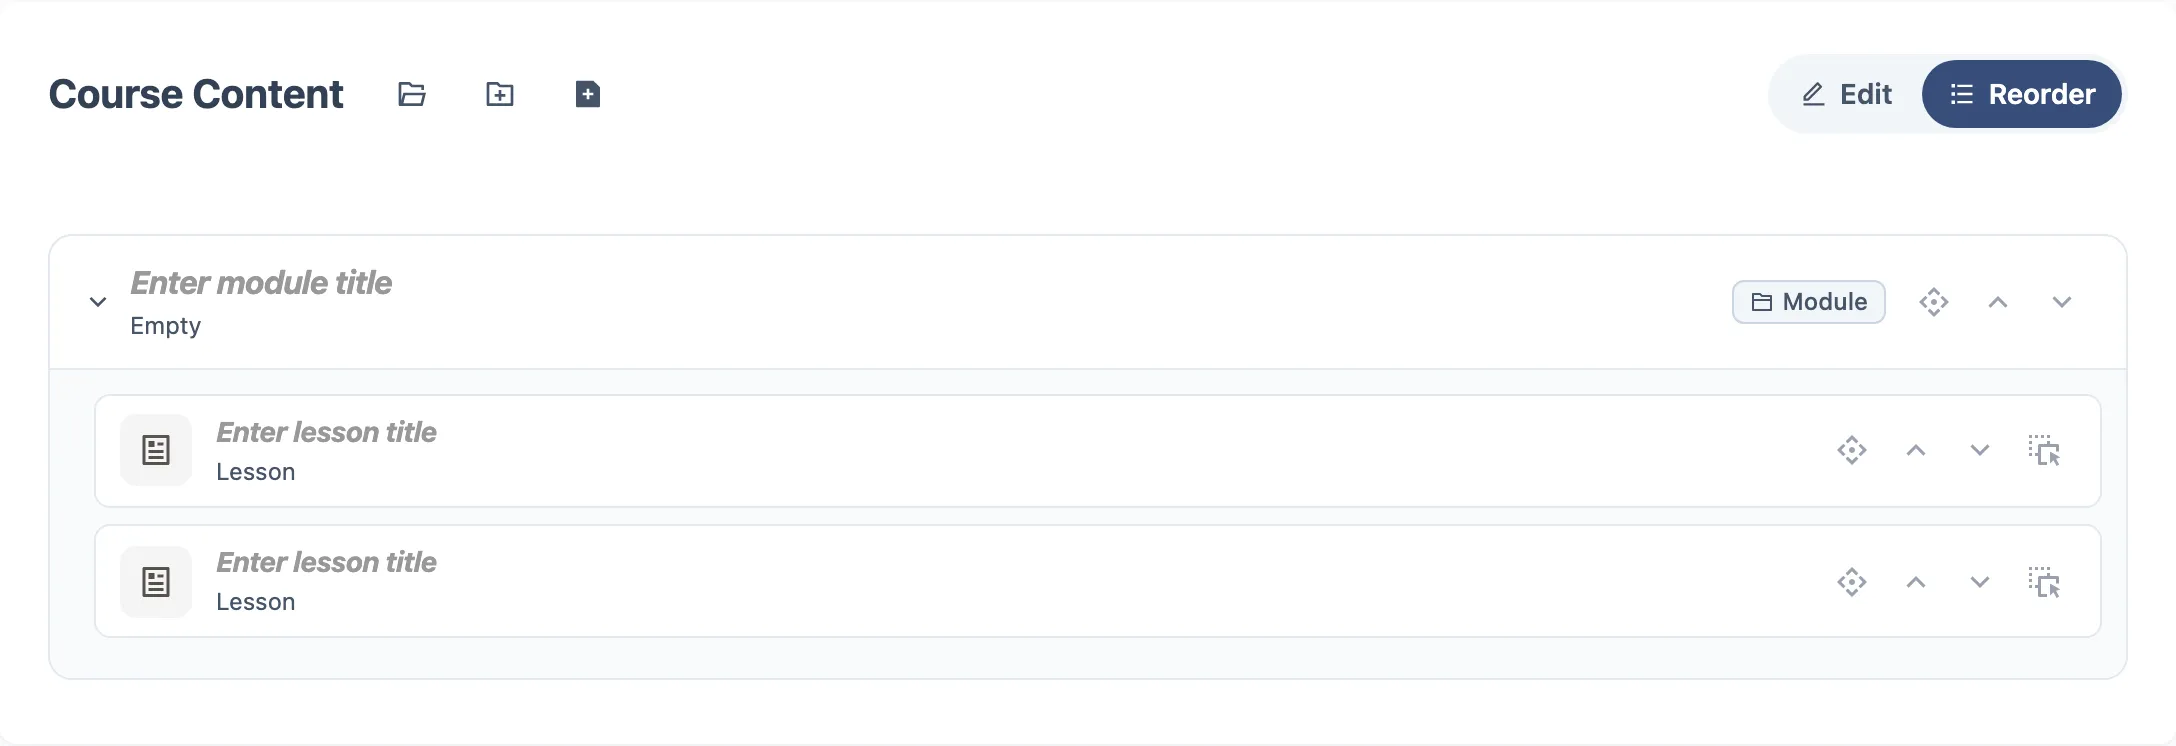
Module rows only get the arrows — no Move to module, since a module has nowhere else to go.
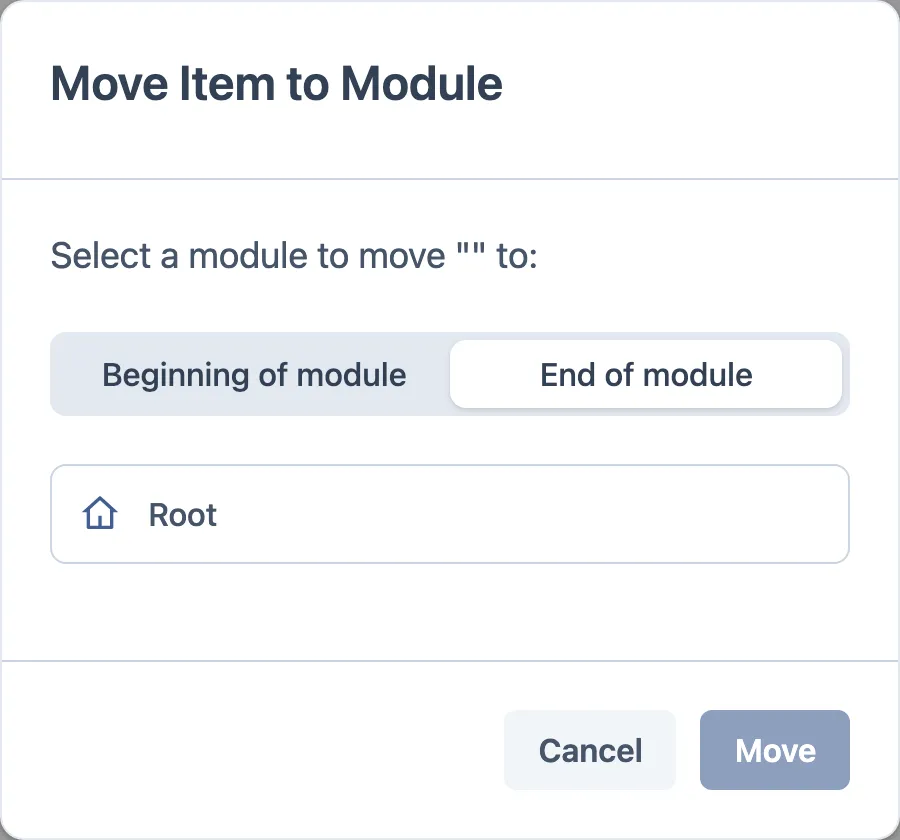
The Move to module dialog
- A position toggle: Beginning of module or End of module (defaults to End).
- The list of target modules. The item’s current parent and the item itself are excluded — so a lesson already in module 1 will not offer module 1.
- A Root entry, shown only when the item currently sits inside a module — that is how you pull something back out to the top level.
- Move stays disabled until a target is picked.
Nesting rules
Nesting is capped at 4 levels, and modules may contain modules. An invalid drop is rejected with a named error, and each message is a distinct case worth reproducing:
| Message | What you did |
|---|---|
| Cannot move a lesson into one of its sub-lessons | dropped a parent into its own child |
| Cannot move a lesson to a location containing its sub-lessons | dropped onto its own subtree |
| Cannot move this lesson here - it would exceed the maximum nesting level | went past level 4 |
| Cannot move this module here - it would cause some lessons to exceed the maximum nesting level | moved a module whose children would go past level 4 |
Steps
- Drag a lesson from module 1 to module 2.
- Drag it back using only Move up / Move down.
- On a lesson inside a module, use Move to module → Beginning of module and confirm it lands first, not last.
- Use Move to module → Root on a nested lesson.
- Nest modules until you hit level 4, then try to go one deeper.
- Try to drag a module into one of its own children.
- Switch back to Edit and reload the page.
What to check
- The order after a reload matches the order you left, for all three move methods.
- Beginning of module really puts the item first.
- The current module is absent from the dialog list; Root appears only for a nested item.
- Invalid moves show the message above and change nothing — no half-move.
- Arrow buttons are reachable and operable by keyboard alone.
Batch mode
The Batch button next to the mode toggle turns on multi-select. The bar then shows
N selected plus Select all, Deselect all, Delete selected and a button to
leave batch mode.
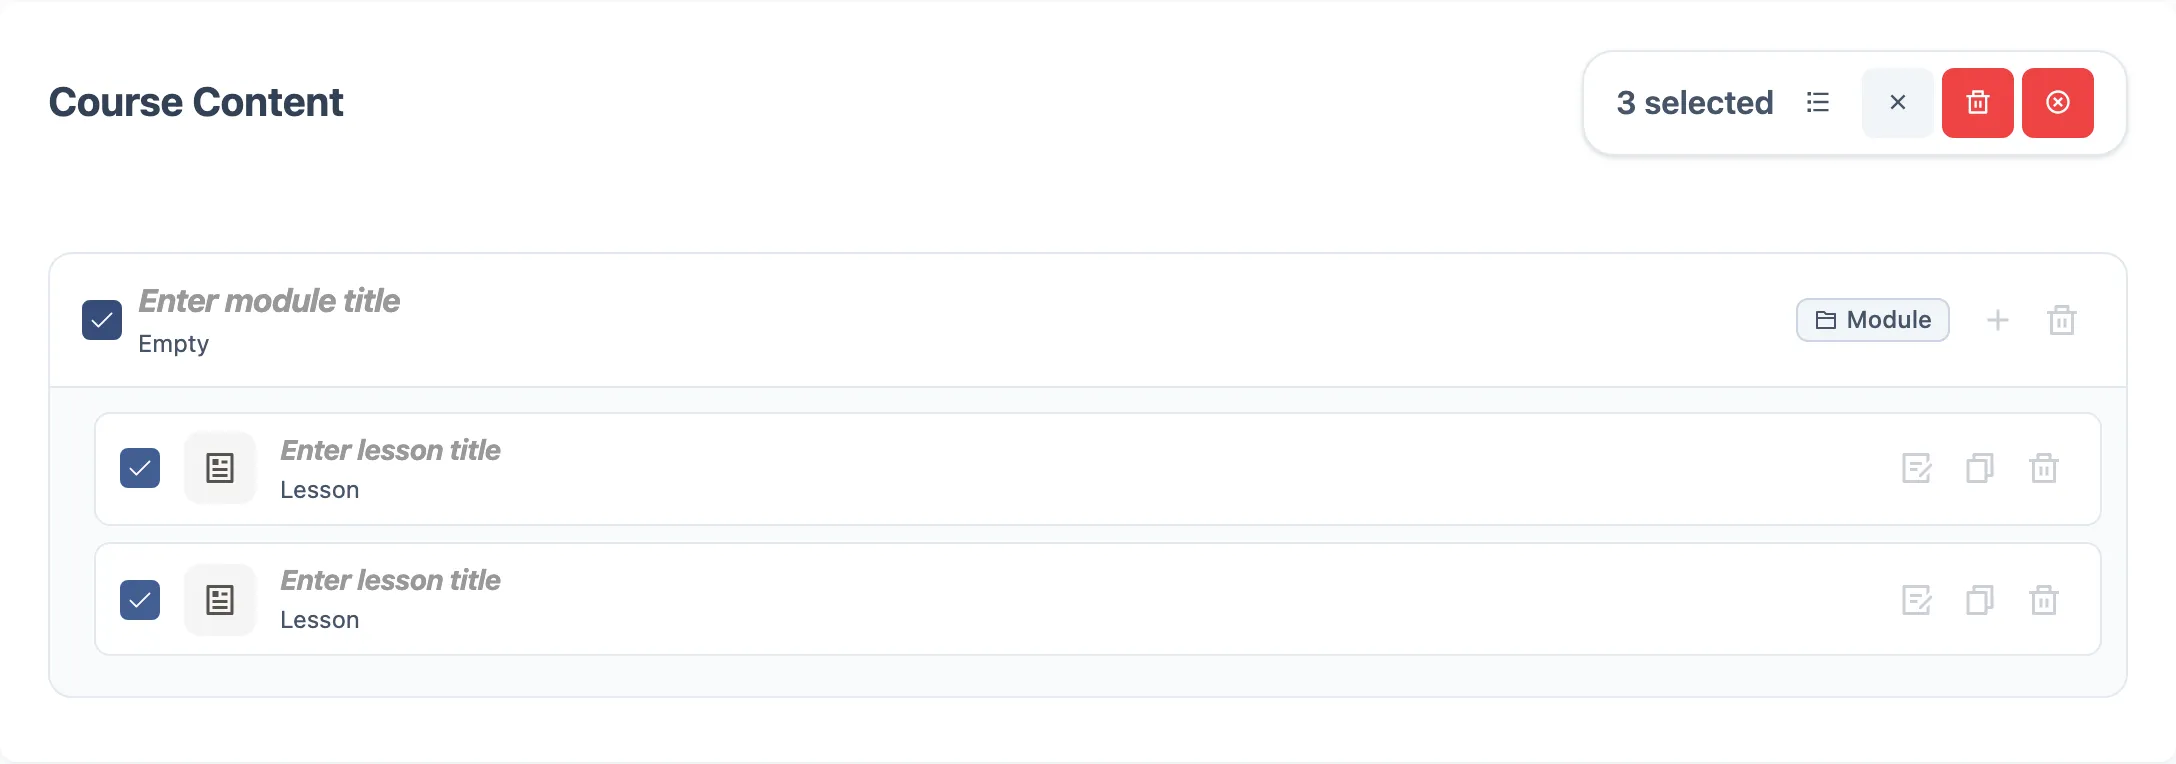
Selecting a module selects every descendant with it — that is deliberate, not a bug. Dragging is disabled while batch mode is on.
Steps
- Turn on Batch. Select a single lesson, then a module.
- Confirm the module’s children were selected too and the count reflects it.
- Deselect all, then Select all.
- Select two lessons and Delete selected.
- Leave batch mode and try to drag — then switch to Reorder and try again.
What to check
- The count matches what is actually highlighted.
- Deleting removes exactly the selection, nothing adjacent.
- The mode toggle and row actions are hidden while batch mode is on.
- Dragging does nothing in batch mode, and works again once it is off.
Where it usually breaks
- Reordering, then leaving the page before the save lands.
- Drag into a nested module landing at the wrong depth.
- Move to module offering the module the item is already in.
- Batch delete taking a neighbouring item along with the selection.
- The activity count in Course at a glance drifting out of sync after removals.
- Two tabs open on the same course — the second overwrites the first.